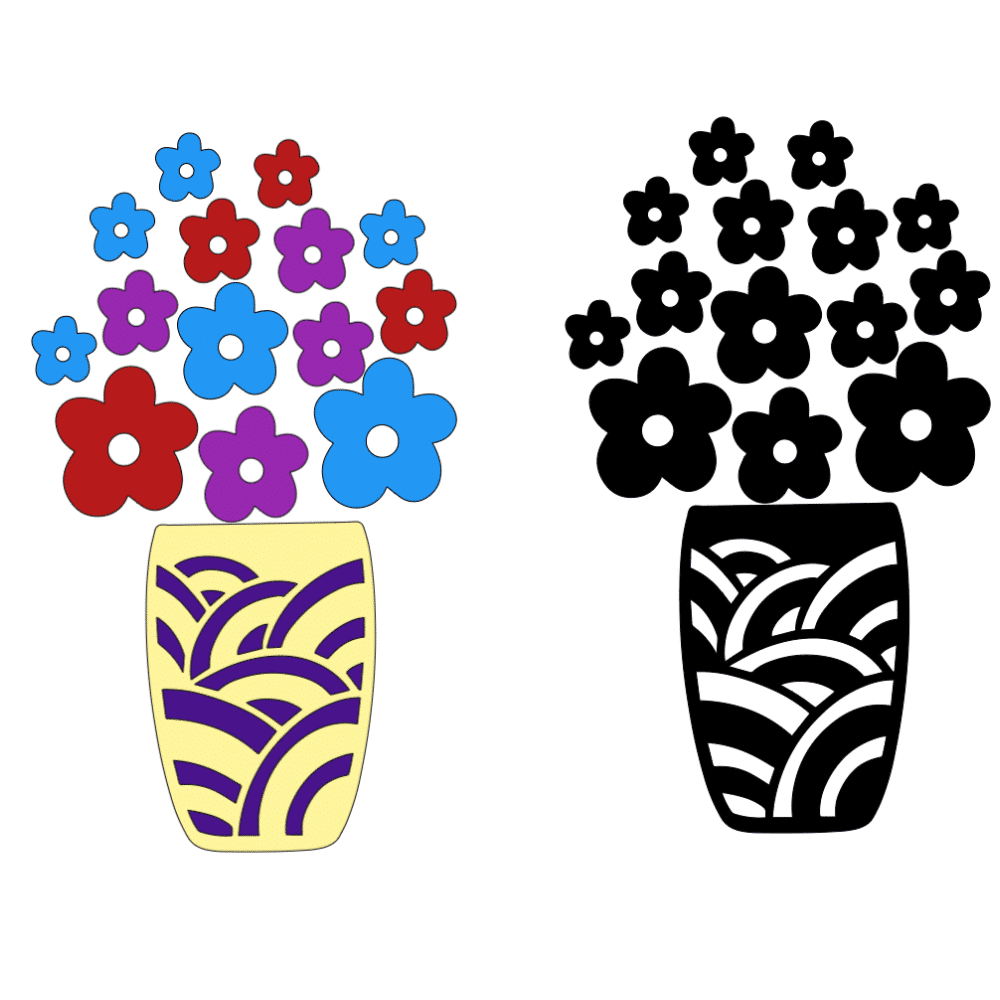
Need Extra Color for your SVG Design?

Have you ever had an incredible SVG but it lacked color pizzazz?
I love the SVG designs I buy or get for FREE. There is not doubt that these designs are all amazing but sometimes they need a little adjustment here and there including adding so incredible colors to really make the design stand out.
Adjusting SVG designs for color is not difficult but it does take some concentration and a few little tricks to make it absolutely EASY!
You can watch the video in our Facebook Group: Https:facebook.com/groups/BettesMakes
Here is an EASY trick you can use to add color to your SVGs
By duplicating the original design and placing it on top of the one you are working with, your contour journey will be much easier!
Step 1: Add an SVG file to your Canvas
It does not matter which design you choose, we used one that was available for Access members but you can use anything you wish. This technique will work with any SVG design.
")
Step 2:. Make a duplicate and set it aside.
You will want to use this design several times and by having a duplicate on hand, you can just copy it from your mat rather than finding it again in the images option.
")
Get Your Annual Pass to the Creative Crafters Club
Step 3: Move the Image to the bottom left of the screen.
You will be working with this design and you will need to see all the parts of the design even when the contour window is open on the screen. By moving it to the bottom left, you will be able to see the entire design. (You may have to adjust the size of your Design Space window so you can see the entire design.)
")
Step 4: Select your file and click on Contour.
For the first part of coloring your design, you will be adding color to the vase itself. This is the easiest place to start as all you need to do is click on HIDE ALL CONTOURS, then click the X in the top right of the Contour dialog box.
You will now have the vase on the screen with all the remaining other components hidden.
Change the color of the vase ( we used Yellow).
")
Step 5: Duplicate the extra design and place it over top of the "vase".
You want to keep that extra design so you will be working with a copy of it. After you duplicate it, move the duplicate over top of the "case" so it pretty much lines up with it. You can be approximate but it is important that it is on top. This may mean you will have to click on Arrange and Send to Front as shown below.
")
Step 6: Select the Design, Click on Contour, Hide All Contours
This time you will be changing the color of the design on the vase. To do this, click on each of the shapes you want to keep while inside the Contour dialog box.
Once you have selected all the "vase" design pieces, click on the "vase" which is on the top of the list of items.
this way the vase is no longer showing and all you will see are the vase design parts.
Click the X in the dialog box to reveal the design parts. Choose a color you would like to see on the vase.
")
Step 7: Duplicate the Original Design, Move it over top of the new design, and Arrange to the Front.
By duplicating the original design and placing it over top, you will be able to select only the flowers you want and avoid selecting others that have already been chosen. Having the original design on top is a visual aid for making sure you select all the pieces you want as well.
Step 8: Click on Contour and Choose a Flower Set
We will now change the color of a few of the flowers. We will do Steps 7 and 8 repeatedly until all the flowers are colored.
With the Contour dialog box open, Click on Hide All Contours then click on any flower and also click on the center circle of that flower. You have now chosen one flower. Choose up to 4 more for this part. We will be coloring these flowers red.
When you have finished choosing flowers and centers, also click on the Vase design at the top of the list to hide it as well.
Close the Contour dialog box
Color the flowers.
")
Step 9: Repeat Steps 7 and 8 until all the flowers have been selected and colored.
Step 8: Click on Contour and Choose a Flower Set
We will now change the color of a few of the flowers. We will do Steps 7 and 8 repeatedly until all the flowers are colored.
With the Contour dialog box open, Click on Hide All Contours then click on any flower and also click on the center circle of that flower. You have now chosen one flower. Choose up to 4 more for this part. We will be coloring these flowers red.
When you have finished choosing flowers and centers, also click on the Vase design at the top of the list to hide it as well.
Close the Contour dialog box
Color the flowers.
")
Step 10: Attach Your Color groups.
Click on each color group and Attach them together. This way your flowers will be in the right position and ready to assemble. The same is true of the vase design. For the design we chose, attaching is not necessary (and not available). Make sure you check any of your designs to see if you need to attach anything before cutting.
Attaching ensures you will not have to place each item on your design one at a time!
Make sure you join our Facebook Group so you can ask any questions!