
From Cricut to Laminators—Discover How to Make Stunning Foil Projects Without Breaking the Bank
Learn 5 beginner-friendly and advanced foiling methods using your Cricut, heat tools, and laminator. Discover tools, materials, and step-by-step instructions for jaw-dropping shine in your next craft project!
Introduction
Foiling can completely transform a handmade project from simple to stunning! Whether you own a Cricut Maker, Explore Air, or Joy, or even just a heat gun or laminator, there are multiple affordable and effective ways to add foil to your cards, tags, scrapbook pages, and more. This guide walks you through five foiling techniques—from Cricut tools to using heat presses, and even regular pens—plus insider tips that’ll make your designs sparkle.
Materials You'll Need
✅ Cricut machine (Maker, Explore Air, or Joy)
✅ Cricut Foil Transfer Tool
✅ Foil sheets (Cricut Foil, Deco Foil, or Thermoweb)
✅ Heat source: Mini Press, Easy Press, or household laminator
✅ Laser printer (for heat-activated foil techniques)
✅ Standard black toner
✅ Heat gun (optional, with caution)
✅ Pens (for pressure-activated foil)
✅ Thermal tape and plain paper
✅ Design Space (for Cricut setup)
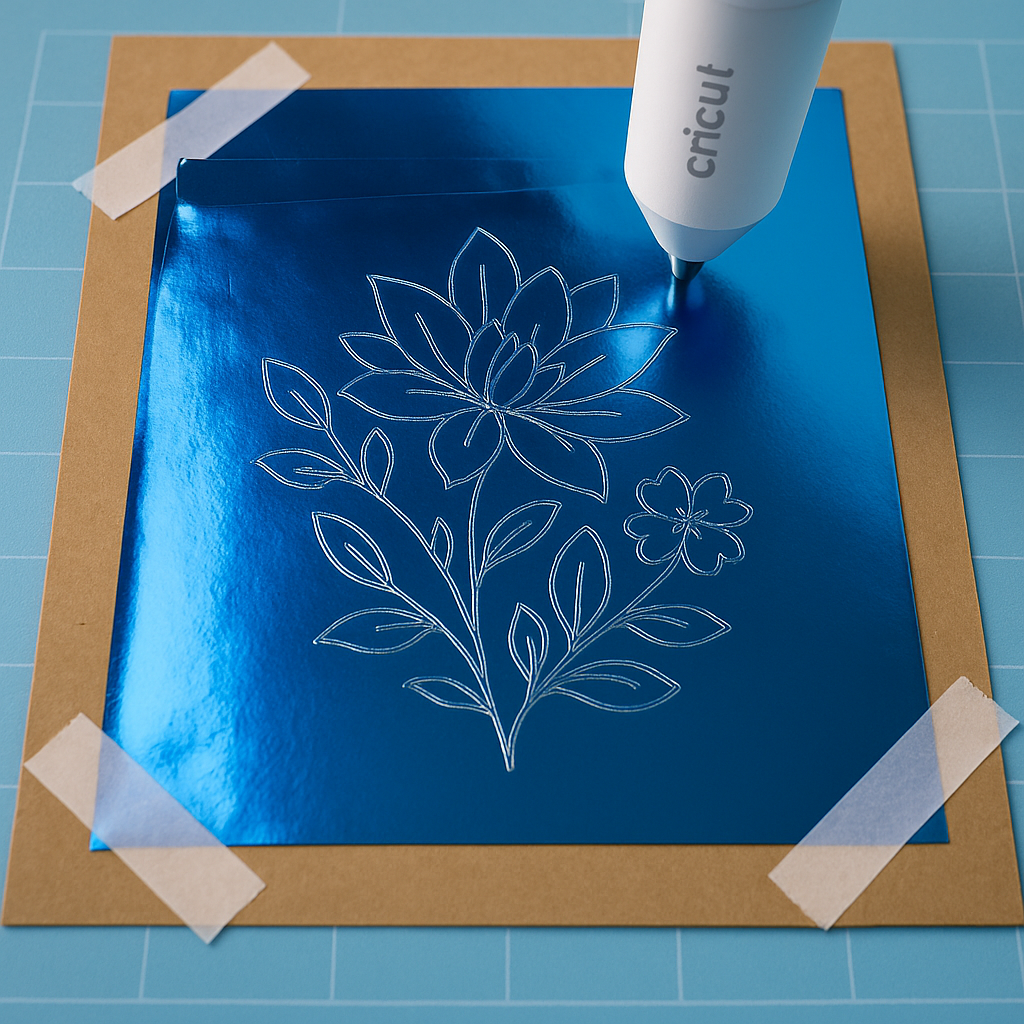
Method 1: Using the Cricut Foil Transfer Tool
Step-by-Step:
- Open Design Space and choose a single-line SVG like a floral outline or monogram.
- Resize your design appropriately (e.g., 8 inches wide).
- Select the design layer and change the operation to “Foil – Medium” for best clarity.
- Tape the foil sheet onto your cardstock securely—tape the sides only to prevent tool drag.
- Attach the foil layer in Design Space and click Make It.
- Insert the Cricut Foil Transfer Tool and let the machine draw your foiled design.
- Remove the foil to reveal crisp, shiny lines.
✅ Best For: Fine line artwork, script fonts, and detailed floral outlines.
Method 2: Heat Gun Foiling (⚠️ Spotty Results)
Step-by-Step:
- Print your design on laser printer paper.
- Place foil on top of printed design and tape it securely.
- Use a heat gun (high setting) and wave it over the foil for about 10–20 seconds.
- Quickly press down using a hard surface or roller.
⚠️ Note: This method often results in inconsistent adhesion and should only be used for a grunge-style or abstract effect.

Method 3: Foiling with a Mini Press
Step-by-Step:
- Place foil over your printed design (laser toner only).
- Cover it with a plain sheet of paper to protect your mini press.
- Set the mini press to high and press firmly over the foil area in sections.
- Slowly lift the foil to reveal solid, bold coverage.
✅ Tip: Use a larger press if available to apply even pressure over bigger designs.

Method 4: Laminator Foiling (⭐ Editor’s Pick!)
Step-by-Step:
- Print your artwork using a laser printer.
- Place foil sheet (DecoFoil or Thermoweb) over the design.
- Feed the paper and foil directly into the laminator—no carrier sleeve needed!
- Let it cool for a few seconds, then peel back the foil.
💡 You’ll get the cleanest, shiniest results with minimal effort.

Method 5: Pen + Pressure Foiling
Step-by-Step:
- Use a regular pen to write or draw on cardstock.
- Place Cricut foil or DecoFoil on top.
- Rub or press the design firmly with a stylus or bone folder over the foil.
- Peel the foil to reveal pressure-applied accents.
✅ Perfect For: Signatures, personalized messages, and freestyle designs.

Bonus Tips
- Always use heat-reactive foil (not adhesive-backed) for these methods.
- Cricut foil works well under pressure, but not all brands will perform with every tool.
- Test on scrap paper first to avoid ruining your good cardstock.
- Combine foil and pen layers in Design Space for multi-color or shadowed effects.
- For multicolor foil: apply one color, remove, then reprint & refoil with the second color.
Final Thoughts
Foiling opens up endless possibilities for Cricut crafters! Whether you prefer crisp designs from a laminator or love the control of the foil transfer tool, there’s something here for every style and budget. Try these methods, mix them up, and get creative. When in doubt—foil it out!
🦋 Download your free Foiling Design Bundle here: https://bettesmakes.com/foiling
#cricutfoiling #foiltransfertool #diyfoilcrafts #cricutmakerprojects #cricutjoyfoil #heatpressfoil #laminatorcrafts #decofoil #thermowebfoil #foiltechniques #papercrafts #cardmaking #diygreetingcards #crafthacks #metalliccrafts
You can grab an Access membership at anytime to use this feature.
