
Cardboard Craft Ideas
Cardboard Craft to me was always making forts for the kids out of leftover boxes. I am sure most of you had done this as a child, I know I certainly did and so did my kids! One day I noticed an art project made out of cardboard (this was only a few weeks ago) and it sparked my interest in what could be made with old cardboard boxes (the corrugated kind). I did some searching and found a few books and some ideas from just doing a web search. The biggest problem was deciding on what to create for today’s blog.
Paper crafting is my absolute favorite when it comes to making projects. I am always exploring what you can do with paper and now today I have added cardboard to the list! If you love crafting then you will want to read “Embossing Techniques” and “Easy Origami Projects” to start. I have many more posts on this blog and am constantly adding more or revising older posts. Please check back often. Do make sure you are on my mailing list so you can get updates right to your inbox.
After my searching, I found most projects would take longer than just a few hours so it is then I decided to do the temple bowl. The original one I found had legs but I made some changes to one that sat on a bottom layer of cardboard. Now, where to find the cardboard to use!
I actually went to the back of my building into the mixed paper recycle bin and pulled out a few boxes to use. Since I was supposed to have 17″ x 17″ pieces I would need very large boxes. As there were none, I opted for 12″ x 12″ pieces I could use and make another pattern adjustment.
Quick links to information in this post
Here’s what you need to make your own Cardboard Craft Temple Bowl. This post does contain some affiliate links for your convenience (which means if you make a purchase after clicking a link I will earn a small commission but it won’t cost you a penny more)! Read my full disclosure policy.
Cardboard Craft Temple Bowl Style Materials
- Corrugated Cardboard – you will need enough so you can cut 7 squares measuring 12′ x 12″. You should cut on the bias (45-degree angle) but if you cannot find pieces big enough, cutting straight will work.
- Cutting tools such as scissors or Xacto style knife. I used an Xacto knife for my cuts and it worked just fine.
- Metal ruler and/or a metal square – to make sure you measure perfect 90-degree angles at the corners. Even when measured you will find a few pieces that will be slightly off.
- Glue – you will be gluing the pieces of cardboard together then trimming them to shape. You will need a glue that will hold up well with cardboard and not have your project come apart.
- Sharpie pen or marker to mark off the areas to be cut.
- Knife for trimming the edges once they have been glued together.
- Paint or Washi tape if you wish to decorate your project. I was considering using some tissue paper and modge podge for giving my project some style. There are many other ways you can decorate and finish off your temple bowl.

Cardboard Craft Temple Bowl Style Step-by-Step Guide
This cardboard craft temple bowl took approximately 3 hours to complete. Most of the time was spent cutting the frames. The gluing and decorating took an additional 30 minutes.
The best part is that you can use any cardboard, however, the thicker pieces give the bowl larger tiers. A perfect recycling project.
Step 1 – Cut out 7 pieces of cardboard that measure 12″ x 12″. These will be the foundation pieces from which everything else is cut.
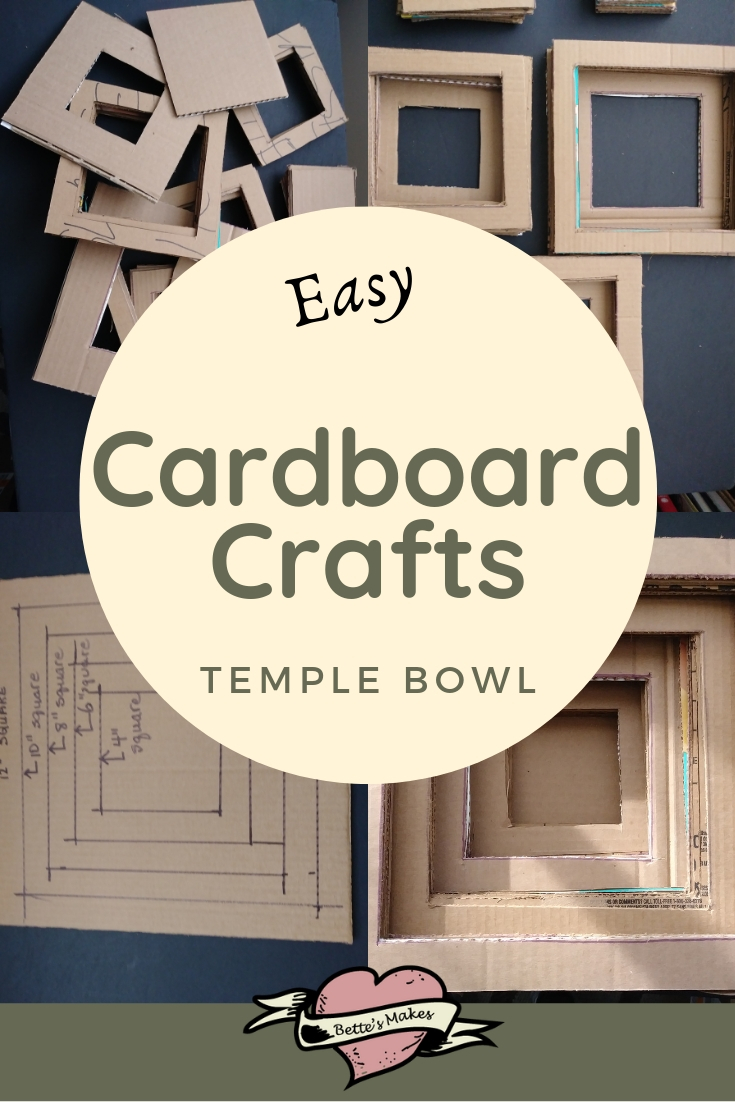
Step 2 – Measure a 10″ square in the exact middle of 1 piece and mark the outline with your marker, then measure an 8″ square in the exact middle and make an outline with your marker. Continue doing this for a 6″ square and a 4″ square. You will end up with one piece of cardboard that has all the sizes measured out. This piece will be used as the template for cutting all the other pieces.

Step 3 – Starting in the middle, cut the 4″ square out of your template. Using the now cut template, place a second piece of cardboard underneath and line them up at the corners, now trace the 4″ square onto the second piece. Do this for all the remaining pieces.

Step 4 – Once you have traced the 4″ square onto all the cardboard 12″ squares, go back to the template board and cut out the 6″ outline. Trace the hole onto all the remaining pieces. Do the same for the 8″ outline and the 10″ outline. Each piece of cardboard should now have squares marked out for a 10″, 8″, 6″, and 4″ cuts.

Step 5 – Before you begin the cuts I need you to understand that you will be making tiers of cardboard that will stack on top of each other. For the top tier, you will have only 6 frames cut at the 10″ mark and the last one of the tier will only be cut at the 8″ mark. The reason is that the top tier needs to have a piece for attaching the next tier down. If we cut all the frames the next tier would simply slip right through. See the image below.

Step 6 – We will start by cutting the frames for the 10″ square. Remember to cut only 6 at the 10″ mark and 1 at the 8″ mark.
Step 7 – Cut the frames for the 8″ mark – cut only 6 at the 8″ mark and 1 at the 6″ mark.
Step 8 – Cut the frames for the 6″ mark – once again you will cut only 6 pieces at the 6″ mark and 1 WITH NO CUT. The reason is that this will be the bottom of the bowl.
Step 9 – Cut the 4″ pieces from the remaining frames – you may cut all of these as the 4″ pieces will form the stand for the temple bowl. In the end you will have 5 stacks of cardboard cut outs as shown in the image below.
Step 10 – Glue each stack together. The top 12″ tier will have 7 pieces but the bottom piece will be the one with the extra cardboard on the inside. Do the same for the 10″ , 8″, 6″, and 4″ stacks. In the end you should have 5 stacks of cardboard ready for you to assemble your bowl.
Step 11 – Trim off any uneven edges if you wish.
Step 12 – Place the 12″ tier upside down on the table then glue the 10″ tier to its bottom (larger) piece. Make sure it is centered to the larger top tier piece.

Step 13 – Do the same as Step 12 for the 10″, 8″ , 6″, and 4″ pieces. Set aside to dry before moving to the next step.

Step 14 – Decorate your bowl and take a photo. Add your image to the comments below or on my Facebook page.
Cardboard Craft Reading Ideas
I selected these books as starters if you love to recycle and reuse materials for crafts. The third book in the list will open your mind to other recyclable materials and how to use them!
The Cardboard Box Book: Make Robots, Princess Castles, Cities, and More!
The Art of Cardboard: Big Ideas for Creativity, Collaboration, Storytelling, and Reuse
Cardboard Creations: Open-Ended Exploration with Recycled Materials
Cardboard Craft Video Inspiration
17 COOL CARDBOARD CRAFTS AND IDEAS
18 BRILLIANT DIYs YOU CAN MAKE FROM CARDBOARD
4 COOL CREATIVE CRAFT IDEAS/TOYS WITH CARDBOARD
Last Word
in order to get this post out today, I did not have time to decorate my temple bowl. I will work on that this week. I love this project as recycling and up-cycling materials is perfect for the person who loves to craft! I am looking forward to finishing off this project another day. In the meantime, I felt it was best to let the glue set overnight before trimming my work. This way I can be sure the layers will not move.
Don’t forget to visit my Resource Library even though there was no template or downloadable for this post. Each week I add templates, SVG files, and other crafting items you can use for any of your projects.
Do Share your project from today. Attach a photo to the comments below or share on my Facebook page.
Until tomorrow…
Bette
Share on Pinterest
