Have you always wanted to make a slider card but did not know where to start?
Have you ever wondered how you can add some extra features to your card making?

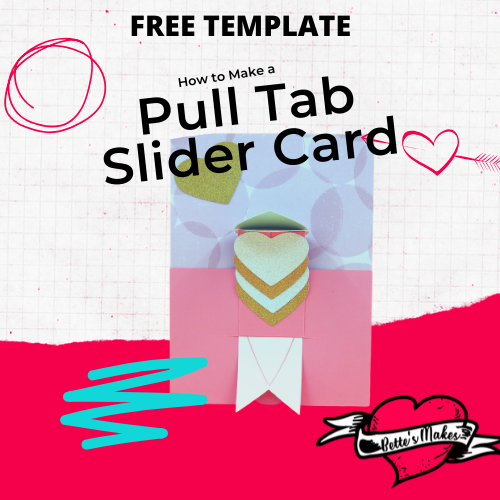
Pull Tab Slider Cards the Easy Way
Slider cards look more complicated than they actually are. If you have ever wanted to make slider cards with different designs without having to find a whole series of templates and then try to figure out how to make them on your own, then take the worry out of making these incredible gorgeous and easy to make cards.
I love a challenge but when I saw this card, I fell in love with the design. I decided there and then to make sense out the directions and make one of my own. I must admit I struggled a bit with making it work but once I understood the mechanism, I was elated!
I am sharing with you my design and template so you, too, can make this gorgeous pull tab slider card. You can find the template in my resource library.
Here’s what you need to make your Pull Tab Slider Card. This post does contain some affiliate links for your convenience (which means if you make a purchase after clicking a link I will earn a small commission but it won’t cost you a penny more)! Read my full disclosure policy.
Quick Links to Information in this Post
Slider Card Materials
Pull Tab Slider Card Step-by-Step Guide

Step One - Download the Template
The template for this project can be found in my resource library. Look under Slider Card for the file. There will be two files in the package. Slider Card 1 and Slider Card 2.
Once you have downloaded the file, you can upload it to Design Space and be ready to make some line adjustments.


Step Two - Design Space Adjustments
When you add the files to your canvas, the first thing you need to do is change the black color to yellow or another lighter color. You will have to do this for both groups of shapes.
Ungroup the two larger shapes. These will be the card front and the card back.
CARD FRONT AND BACK
You can decide if you want to cut these from two different colors or keep the front and back of the card the same color. I like to have a different color for the back of my card.
CARD SLOT
Click on the bottom rectangle with the slit in the middle. You will not need to adjust this piece but you will need to group the lines and then attach them to be one piece.
PULL TAB
Next we will work on the shape with the heart in the middle.
the top small line will need to be converted into a score line.
the heart in the center needs to be converted to a draw line.
Select the shape, the heart and the score line and group them together, then attach them.
Choose one of the greetings and group it together.
Move the greeting to the center of the heart then change it from cut to draw.
Attach the greeting to the heart group.
Hide the other greetings by group them individually and turning off their visibility (click on the eye beside their group)
SLIDER TAB
The slider tab has a line down the center which you can change to a draw line or you can have a score line placed here. This line is to be used for centering the hearts on the slider.
Select the rectangle and the center line and group them.
Arrange the rectangle so it is at the back of the stack.
You should see six horizontal lines on top of the shape. If you do not see all size, click on send to back once again.
Change these horizontal lines to score lines.
Select then entire shape plus the new score lines and group them together. Then click on Attach to make sure all the lines stay in the right place.
HEARTS
You should find 2 hearts as part of the template. You will be making these two different colors. Make one red and one green.
Duplicate the green heart until you have 3 green hearts.
Duplicate the red heart until you have 4 red hearts.
SAVE YOUR PROJECT
MAKING IT
For this project you will want to have different colored hearts. I chose a glitter cardstock in silver for one set and gold for the other.
For the pull tab, you will need to select a cardstock where the drawing will show easily. If you use a pattern cardstock here, you are not likely going to be able to read the words.
The card itself can be all the same color or you can choose a different pattern or color for either the back of the front.
The glitter shape goes on the front. So any color will work here.
Go ahead and make the cuts and then we will go through how to assemble the card.


Step Three - Assembling the Pull Tab Slider Card
CARD FRONT AND BACK
All you need to do here is glue the two pieces together. Make sure they line up at the edges for a really professional look.
PULL TAB
Bend the score line forward towards the greeting. You will be gluing this to the heart piece a little later.
SLIDER TAB
You should see 6 horizontal score lines on this slider tab.
You will be folding these all in the same direction in preparation of adding the hearts. Be sure to make sure the folds have a really deep crease.
HEARTS
You will be placing the hearts onto the slider tab and alternating the colors.
Turn the tab so that the large unfolded piece is at the bottom.
Glue one of the hearts to the bottom piece. Line up the top edge of the heart to the first score line.
Take a heart of the opposite color and apply glue to the backside at the top only then place the heart face up so it is just below the next score line. See the diagram.
Alternate the hearts and glue them to the next score line until you have no hearts left. I had one left at this step but not to worry if you do not.
MAKING THE SLIDER
Place the heart strip on top of the greeting so that the fold at the top of the greeting is lined up with the top of the heart line.
Glue the flap to the backside of the heart group.
Insert the tab into the slot from the back of the small rectangle. This way the tab will poke through showing only the ends of the tab.
Lie the hearts down so the whole slider is completely flat.
Glue the flat piece of the hearts to the center top of the small rectangle as shown.
Test the pull tab to make sure it all works.
GLUE THE TAB TO THE CARD
Apply glue to the inside bottom and sides of the card front rectangle. Glue it to the card itself and make sure the bottom and sides line up.

Step Four - The Finishing Touches
If you have a heart left over, you can add it as an embellishment.
Add any other decorations you want to have for the card and write a greeting for the recipient.
Be sure to take a photo and share it on Instagram! Share this tutorial with your friends so they, too, can make such a cute and gorgeous card.
More Craft Ideas from BettesMakes
Here are some amazing crafts you can make from BettesMakes.com
This is just a sampling of the dozens of crafts you can find on my website.
How to Make a Pull Tab Slider Card Video
Last Word
A slider card with hearts and a pull tab is so cute! I loved making this one and getting the hearts to flip up when I pulled the tab made my day. My issue has always been getting glue all over my hands! Did you make one for Mother's Day or a birthday? With those special occasions hitting us every month, this card is a great one to use. Adding a special envelope so you can mail it would be perfect.
Did you have any issues with this project? I hope not, but if you did, please let me know. Just send an email to bette@bettesmakes.com.
I hope you enjoyed this project as much as I did.
If you made a card, please share it on our Facebook group. I absolutely love seeing all the projects my friends and community make. https://Facebook.com/groups/BettesMakes
Until next time,
Happy Crafting!


Please join me on Pinterest: https://Pinterest.ca/BetteMakerCreations
Join my Facebook group: https://facebook.com/BettesMakes
Follow me on Instagram: https://Instagram.com/BettesMakes
Subscribe to my YouTube Channel: https://www.youtube.com/c/BettesMakes
Please pin this image to your favorite Pinterest board so you can return here at anytime